Microsoft
Word offers various features that help you improve the layout of text in a
document. Two of these features including – Bullets
& Numbering and Borders
& Shading. Certain other features like Thesaurus, Spelling and Grammar can make your work very easy. Let us discuss these features in details:
& Shading. Certain other features like Thesaurus, Spelling and Grammar can make your work very easy. Let us discuss these features in details:
Bullets and Numbering:
The
bullets and numbering feature of Microsoft Word is useful when you want to
present your text as a list of items. A bullet is a small symbol such as a
square or a dot placed in front of each list item. When the order items is important
such as the steps to perform a given task, you use a numbered list. When the
order of items is not important, you can create a bulleted list.

Create a bulleted list:
Step 1:
Select the text you want to format as a list.
Step 2:
On the Home tab, click
the drop-down arrow next
to the Bullets command in Paragraph group. A menu of bullet styles
will appear.
Step 3:
Move the mouse over the various bullet styles. A live preview of the bullet
style will appear in the document. Select the bullet style you want to use.
Step 4:
The text will be formatted as a bulleted list.

Defining New Bullets for a Bulleted List:
Step 1: On the Home tab,
click the drop-down arrow next
to the Bullets command
in Paragraph group. A menu
of bullet styles will appear.
Step 2: Click on the Define
New Bullet option. The Define New
Bullet dialog box appears.
Step 3: Click the Symbol button
to choose a symbol for the bullet. Click on the Font
button to format the symbol by changing the font, font size, colour etc. You
may also click on the Picture
button and choose a picture as a bullet.
Step 4: Click on OK.
The new bullet gets added to the library of available bullets.

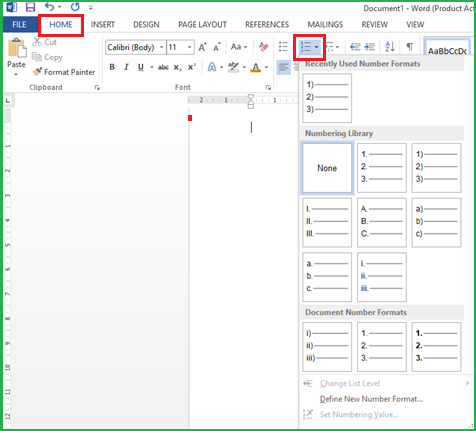
Create a numbered list:
Step 1:
Select the text you want to format as a list.
Step 2: On the Home tab,
click the drop-down arrow next
to the Numbering command in
Paragraph group. A menu of numbering
styles will appear.
Step 3:
Move the mouse over the various numbering styles. A live preview of the
numbering style will appear in the document. Select the numbering style you
want to use.
Step 4:
The text will format as a numbered list.
Defining New Number Format for a Numbered List:
Step 1: On the Home tab,
click the drop-down arrow next
to the Numbering command in
Paragraph group. A menu of numbering
styles will appear.
Step 2: Click on the Define
New Number Format option. The Define New
Number Format dialog box appears.
Step 3: Choose Number
style and a Number format.
You can also click on the Font
button to format the numbers by changing the font, font size, colour etc.
Step 4: Click on Ok.
The new number format gets added to the library of available numbering format.

Borders and Shading:
To
enhance the look of your document further, you can add borders around the text,
a paragraph or a page.
Borders around Text or a Paragraph:
Follow
the given steps to add borders around the text or a paragraph:
Step 1: Select the text or a paragraph around
which you want to apply border.
Step 2: Click on the Borders
option in the Paragraph group under the
Home tab Or Click on the Page Borders option in the Page Background group under the Design tab. The Borders
and Sheading dialog box appears.

Step 3: Click on the Borders
tab in the Borders and
Sheading dialog box.
Step 4: Choose the desired settings for the
border.
- Choose an appropriate option under the Setting section.
- Choose the border style from the Style list box.
- Choose the border colour from the Colour list box.
- Choose the border thickness from the Width list box.
- Choose to apply the border around the paragraph from the Apply to box.

Step 5: Click Ok.
The selected text or a paragraph is surrounded with the chosen border.
Borders around a page:
Follow
the given steps to add borders around a page:
Step 1: Click on the Borders option
in the Paragraph group under the
Home tab Or Click on the Page Borders option in the Page Background group under the Design tab. The Borders
and Sheading dialog box appears.

Step 2: Click on the Page
Borders tab in the Borders and
Sheading dialog box.
Step 3: Choose the desired settings for the page
border.
- Choose an appropriate option under the Setting section.
- Choose the page border style from the Style list box.
- Choose the page border colour from the Colour list box.
- Choose the page border thickness from the Width list box.
- Choose the page border artwork from the Art list box.
- Choose to apply the border around the paragraph from the Apply to box.

Step 4: Click Ok
to apply the settings. The border is applied around the page.
Checking Spelling and Grammar:
We
might make mistakes while typing text. You can check for the spelling and
grammatical mistakes in your entire document by using the Spelling
& Grammar feature. Word helps us in identifying our mistakes
by underlining the spelling
mistakes with red wavy lings and grammatical mistakes with green wavy
lines as you type text in a document. Word puts red wavy lines under the words
that are not available in its built-in dictionary. This may include the names
of the people, name of the some places specific to a country etc.
To run a Spelling and Grammar check:

Step 2: The Spelling and Grammar dialog box will appear. For each error in your document, Word will
try to offer one or more suggestions. You can select a
suggestion and click Change to correct the
error.


N: B: If no
suggestions are given, you can manually type the correct spelling in your
document.
Shortcuts Key: Spelling and Grammar: Press F7
Shortcuts Key: Spelling and Grammar: Press F7
Ignoring
"errors"
The spelling and
grammar check is not always correct. Particularly with grammar,
there are many errors Word will not notice. There are also times when the
spelling and grammar check will say something is an error when it's actually
not. This often happens with people's names, which may not be in the
dictionary. If Word says
something is an error, you can choose not to change it. Depending on whether
it's a spelling or grammatical error, you can choose from several options:
For
spelling "errors":
- Ignore: This will skip the word without changing it.
- Ignore All: This will skip the word without changing it, and it will also skip all other instances of the word in the document.
- Add: This adds the word to the dictionary so it will never come up as an error. Make sure the word is spelled correctly before choosing this option.

For grammar "errors":
- Ignore: This will skip the word or phrase without changing it.

N: B: For
grammar errors, Word provides an explanation for why it thinks something is
incorrect. This can help you determine whether you want to change or ignore it.
Automatic spelling and grammar checking
By default, Word
automatically checks your document for spelling and grammar errors,
so you may not even need to run a separate check. These errors are indicated
by colored wavy lines.
The red line indicates
a misspelled word.
The blue line indicates
a grammatical error, including misused words.
To correct spelling errors:
Step 1: Right-click the underlined
word. A menu
will appear.
Step 2: Select the correct spelling from the list of suggestions.
Step 2: Select the correct spelling from the list of suggestions.

N: B: You can
also choose to Ignore All instances of an underlined word or add
it to the dictionary.
To correct grammar errors:
Step 1: Right-click the underlined word or
phrase. A
menu will appear.
Step 2: Select the correct spelling or phrase from the list of suggestions.

Step 3: The corrected phrase will
appear in the document.
N: B: You can
also choose to Ignore an underlined word or phrase or go
to the Spelling & Grammar pane for information
about the grammar rule.
To change the automatic spelling and grammar check settings:
Step 1: Click the File tab to go to Backstage view, then click Options.
Step 2: A dialog box will appear.
On the left side of the dialog box, select Proofing. The dialog box gives you
several options to choose from:
- If you don't want Word to automatically check spelling, uncheck Check spelling as you type.
- If you don't want grammar errors to be marked, uncheck Mark grammar errors as you type.
- If you don't want Word to check for contextual errors, uncheck Frequently confused words.

N: B: By
default, Word does not check for sentence fragments (incomplete sentences) and
run-on sentences. To turn on this feature, click Settings in
the dialog box, then check the box next to Fragments and Run-ons. If
you've turned off the automatic spelling and/or grammar checks, you can still
run a check by going to the Review tab and clicking
the Spelling & Grammar button.

To hide
spelling and grammar errors in a document:
If you're
sharing a document like a resume with someone, you might not want that person
to see the red and blue lines. Turning off the automatic spelling and grammar
checks only applies to your computer, so the lines may still show up when
someone else views your document. Fortunately, Word allows you to hide spelling
and grammar errors so the lines will not show up on any computer.
Step 1: Click the File tab
to go to Backstage view, then click Options.

Step 2: A
dialog box will appear. On the left side of the dialog box, select Proofing.
Step 3: Check
the box next to Hide spelling errors in this document only and Hide grammar
errors in this document only, then click OK.

Step 4: The
lines in the document will be hidden.
N: B: If you
have more than one document open, click the drop-down box next to Exceptions
for: and select the desired document.
Using Thesaurus:
Word has
an in-built dictionary called Thesaurus.
You can use it to look for meaning
(synonyms)
and opposites (antonyms)
for a particular word. The Thesaurus proves to be useful by helping you improve
your vocabulary or by finding suitable words for correct sentence building. The
steps to use the Thesaurus are:
Step 1: Place
the cursor anywhere within the word for which you want to look for a synonym.
Step 2: On the Review tab, click the Thesaurus option in the Proofing group.

Step 3: A list of
synonyms (and antonyms, if any) appears in the Thesaurus
task pane on the right side of the window.
Step 4: To use
one of the words from the list, point to it. Then, click on the down arrow next
to it and select the Insert
option.

Step 5: The
existing word gets substituted with the new synonym.
N: B: The list
of synonyms is also displayed when you right-click on a word and choose the
synonyms option.


0 comments: